
In this post, I will talk about the iOS diags mode!
I will also assume that you have a bit of knowledges about bootloaders and firmwares (also in reverse engineering, programming, …).
I did not had enough time to do the necessary to boot up with a RELEASE image (knowing that I probably spent a month for writing this post due to school) so the BUILD_STYLE of the iBoot used in this post is DEVELOPEMENT.
However, it is actually possible to boot in diags mode from a RELEASE image by following this blog post (do not forget to repack the image before loading it to the device though).
I am not a robot so if I happens to say some things wrong, let me know! :)
I will talk about Apple Internal software for educational purposes only so do not expect any files from me.
0x1. Once upon a time…
From the release of iOS 10.3, iOS contain an hidden functionnality called Diagnostics (with the side buttons…), and this is absolutely not what we are about to talk here ww.
Before starting, lets take a look to the iPhone boot chain which is designed to be working like this :

Just to be sure, I will remind some things:
- The iBSS is the DFU Mode LLB that setup the Hardware, check and load the
iBEC. - The iBEC is the DFU Mode iBoot and just like the
iBootit “handles an access to the FileSystem (because it needs to read a special “restore” partition during upgrades)” (xerub).
Note that this chain can also be modified by jailbreaks, the best example I have now is limera1n:
 A BootROM exploit is executed, a payload is sent in DFU, an other payload and its ramdisk is uploaded, the device boot then a kernel exploit is executed in the userlad to achieve an untethered jailbreak
But for booting in diags mode, the boot chain is a little bit different :
 The
The iBSS and iBEC have to stay decrypted when they are loaded in the device, even with the IMG3 or IMG4 header.
Note that this boot chain can only happens when a BootROM exploit is executed (exploits like limera1n, checkm8, …), OR when softwares like kloader are executed (the boot sequence remains the same except that the iBSS bootloader is loaded in the RAM from the userland and not from the BootROM).
So now lets talk about the diags mode, that is used to test the device capabilities.
These tests are basically applied on prototypes devices (EVT, PVT and DVT) before the official release of a device.
The Diagnostics are before all a firmware that is either an IMG3 image with the gaid tag and that needs to be renamed as diag.img3 before being loaded to the device (32bit), or either an IMG4 image with the diag tag and that also to be renamed too as diag.img4 before being loaded to the device (64bit).
That image will, like others iOS bootloaders, open a serial connection on the baud rate 115200 and can be booted (after that the iBSS and the iBEC are fully loaded) using one of these two iBoot commands :
- The go command : it has been used multiple times in older jailbreaks utilities such as Syringe (but just in case), this command is used to jump to the (address of the) last image loaded in memory (which here should be the
diagimage). - The diags command : this command will try to find in the
NANDand theNOR(AppleInternal/Diags/bin) an image of type64 69 61 67(diag) then jumps to its address if the image is found (however, for some reasons this debug path is no longer working on some64bit).
By the way, here is a tiny note : unlike the go command, the diags one is a little bit particular.
I was curious about the real difference between these two commands so I had the idea to look at the iBoot source code (apps/iBoot/boot.c) and I found 3 functions related to the diags:
int boot_diagnostics(void);int boot_diagnostics_fs(void);int do_diagboot(int argc, struct cmd_arg *args);
It seems in the first place that the do_diagboot() function is in fact the diags command that we see when the help command is used, and takes in count the arguments given:
If there is an argument, the function should run like the
gocommand (except that it will check if the image can be loaded in memory with some other checks and if it fails, aPermission Deniederror message will be printed) and should load the given image,Else if nothing is provided, the
do_diagboot()function will call theboot_diagnostics()one (which is a pretty small function) :

And as you can see, this function will calls an other one, which is the boot_diagnostic_fs(),
The boot_diagnostic_fs() function will try to boot the diags directly from the FileSystem, starting by getting the value of the environment variable diag-path (which checks the AppleInternal/Diags/bin/ directory) that is by the way standing in the NVRAM (the value is stored in the const char *diag-paths variable) and by trying to mount the boot file system at the /boot directory.
I added some comments but this screenshot should be enough detailed to understand what is happening here (this is the following part of my explaination from above) :
 If it fails, the
 /boot directory is unmounted and that is where you see a message error.
So yes, this is what happening when you execute the diags command.
Additionally, I noticed some things that could be interesting to take a look to :
- First, after an
hexdumpof thediags(64bit) we can notice that theaddr baseof the firmware is at0x800, then there is only somefand0until0x8000.
I also used a tool called UEFITool to look a little bit and here is what we can see first:

At first I did not what this offset was, and if we look well, we can see that it is in fact the FileSystem GUID Partition Table.
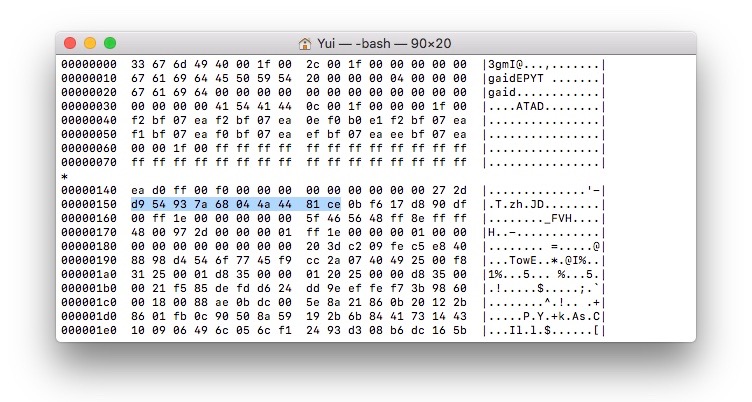
So after reversing the order of the selected text from above and re-opened the hexdump, what do we see at 0x8000 ?
The GUID Partition Table offset!

I checked a little bit too at a diag for 32bit and I found out that the The GUID Partition Table is not at 0x8000 but at 0x150.
I took the GUID for example but if I looked a little bit more further, I am pretty sure that I could find the payload and every other commands that the diags handle.
- One more thing that I noticed is that when I scrolled down, I found something called
PreEfi.[extension](I found it in a string) in thediagimage.
1
2
3
003cd0c0  73 2f 53 6b 79 65 32 37  43 64 69 61 67 2f 72 65  |s/Skye27Cdiag/re|
003cd0d0  6c 65 61 73 65 2f 62 6f  6f 74 6c 6f 61 64 65 72  |lease/bootloader|
003cd0e0  2f 50 72 65 45 66 69 2e  6d 61 63 68 6f 00 00 00  |/PreEfi.macho...|
At the beginning, I did not really know what that thing was and with a bit of research I ended up surprised to find this kind of stuff :
 Most of the time, all of the documentation that I found about this were written by Microsoft.
So yes, after some researches, here is what I found and learned:
FVstands forFirmware Volume, where thePEIis searched for in,PEIstands for Pre-Efi Initialization,PEstands forPortable Executablethat is refering to the fact that the format is not architecture specific, I am not surpirsed about why it is used here now (its the magic value is50 45, akaPE),DOSheader, which should owns a length of0x40(or64 bytes) and its magic value is4D 5A, akaMZ.
As you can see, the Diagnostics that we were used to run normally are in fact running a software that is actually EFI compatible! (part of the UEFI environment).
Then after a bit of documentation reading and minutes of thought, I assume that every available commands are in fact corresponding to an Efi Module (like the sep command, the memrw one, aes, and every other ones …), these commands are by the way loaded in the RAM.
For finishing, when the diags are finally booting, some commands (available in the diags mode) are ran to checks if the device is able to run the image correctly.
It is actually quite difficult to know more about, which is very unpleasant but we have no choice except admit it anyways- (the diags image seems to be packed, but not encrypted neither holding any KBAG values). :((
Also, while I was writting this blog post I found out that someone else made an amazing blog post about the iBoot and others bootloaders.
If you are interested, you can read this blog post (written by Jonathan Levin). ^△^
0x2. Boot Time
Well, this part is just like a mini tutorial to demonstrate how to enter in diags mode.
Also, I am not responsible if you ever meet a problem due to the following steps so do it at your own risks, you have been warned.
Make sure that your device is jailbroken (I am using the checkra1n jailbreak under iOS 13.5), and to get a DEVELOPEMENT bootloader (iBSS and iBEC).
I will use an iPhone10,4 (D20AP) to boot in diags mode (I will not write for 32bit else this blog post would be too long but if you need help or want to know more, I will try to do my best to help you though). (^0^)v
As we just saw previously, we need to be in pwnedDFU mode (pwning the BootROM), thats why I will use first use checkm8 and then apply the signature patches for then loading unsigned img4 images by using this iPhone8 or iPhone5S ipwndfu fork :
1
2
3
4
5
6
7
8
9
10
> Yui@Altria:D20 $ ./ipwndfu -p && ./ipwndfu --patch
*** checkm8 exploit by axi0mX ***
Found: CPID:8015 CPRV:11 CPFM:03 SCEP:01 BDID:0A ECID: IBFL:3C SRTG:[iBoot-3332.0.0.1.23]
Device is now in pwned DFU Mode.
(0.88 seconds)
Heap repaired.
Bootrom Patched
you can now load unsigned firmware
and debug the next boot stages
> Yui@Altria:D20 $
Before starting to load anything, I will do a simple test to see if my device (which is in pwnedDFU mode) can really accept unsigned images by creating and sending a random single one file and sending it using the tool that I have been wrote called iBootime:
1
2
3
4
5
6
7
8
> Yui@Altria:D20 $ iBootime --mode
[device_mode]: detected device in pwnedDFU mode.
> Yui@Altria:D20 $ touch scatman
> Yui@Altria:D20 $ iBootime --load scatman
[upload_file]: sending scatman..
[==================================================] 100%
[upload_file]: successfully sent scatman.
> Yui@Altria:D20 $
Great, it loaded just fine which means that we can now load properly our iBSS:
1
2
3
4
5
> Yui@Altria:D20 $ iBootime --load pwnediBSS.img4
[upload_file]: sending pwnediBSS.img4..
[==================================================] 100%
[upload_file]: successfully sent pwnediBSS.img4.
> Yui@Altria:D20 $
At the same time, I always use a serial console to see the log (in my case I use termz), so if you do it too, you should see this kind of output once the iBEC has been loaded to the device (anyways, you will have to run the serial console for interacting with the diags):
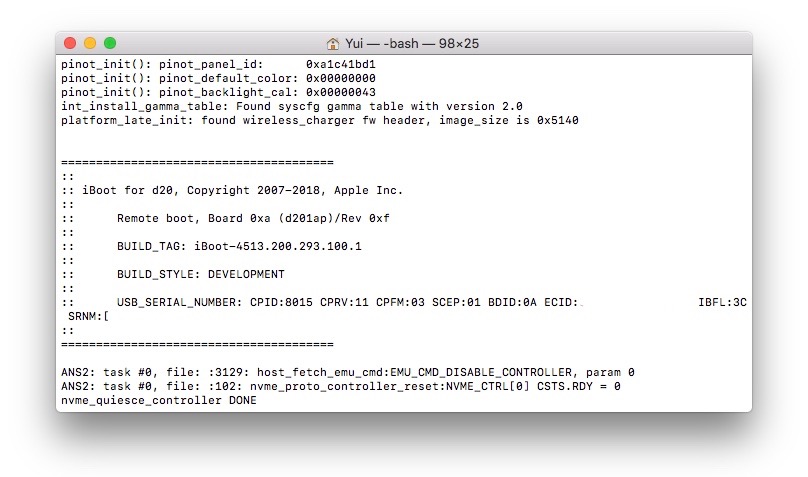
Based on the
BUILD_TAG, it seems that this is an iOS 12.0 bootloader.
On a side note, this iBoot owns some strings that I did not saw before such as:
ASN2that apparently meansApple NAND Storage 2which appears to be an SSD controller used in theT2chips (Mac) and in iPhones,nvmethat apparently stands forNon-Volatile Memory Expresswhich is used to access to a storage media such as an SSD (it seems logic to me as we previously talked aboutASN2) etcetera etcetera…SMCthat apparently stands forSystem Management Controllerwhich is used to manage the Hardware such as theUSB, battery, …
These softwares are also used in the Macs.
The time has come to load the diags image, but in my case, I need to pack my diags image into an IMG4 image (I will still use iBootime, that will adds a total size of 11 bytes once that the image will be created) :
1
2
3
4
5
6
7
> Yui@Altria:D20 $ iBootime --img diag
[check_imgtag]: detected diag image (IM4P)..
[create_image4]: creating img4 of type diag..
[create_image4]: Data Size  =  6324279 bytes,
[create_image4]: Total Size =  6324284 bytes,
[output_image4]: successfully created diag.img4!
> Yui@Altria:D20 $
And then we should now be able to properly load it to our device !
I am truly sorry because there is a weird bug that make
iBootimeunable to load adiagimage, so I had to use irecovery to load it… I will do my best to find enough time and try to fix it!
1
2
3
> Yui@Altria:D20 $ irecovery -f diag.img4
[==================================================] 100.0%
> Yui@Altria:D20 $
And then we can boot into Diagnostic mode by using iBootimes --start -r option because it will sends the go command (and as we just loaded the Diagnostic image, the last address loaded in memory would be this one).
1
2
3
> Yui@Altria:D20 $ iBootime --start -r
[main]: booting..
> Yui@Altria:D20 $
And from there, the device should boot and give you an output just like that:

0x3. Conclusion
It was a really interesting research, I learned a very lot about bootloaders and the diags!
I also had the chance to get some DEVELOPEMENT images which helped me a lot through this so may thanks to the people who gave it to me and for some tips, you all are amazing !
Also, I noticed some commands that could be potentially interesting (or not) to try, such as:
1
2
3
4
5
sep
nvram
memory [--info] | [--list] | [--leak] | [--dump] (address) (length)
syscfg [init | add | print | list | type | delete] (KEY) (value1) (value2) ...
[...]
I did not tested some of them yet
(except of course the memory command like : memory --dump 0x800000000 0x1EA)
but if someone also wants to play with the diags and maybe bricks their device too, hit me up so I can see what the commands did to it. :p
Anyways that is all I wanted to say, I hope this was helpuful!
you can follow me on my twitter if you liked this post and you can also support me by looking at my others projects on GitHub!
Thank you for your time. ヾ(・ω・*)